

Did you know that you can use WordPress Statistics as the key to the ultimate business growth in 2025? Well, if you are surprised to hear that, let us provide you access to this ultimate treasure. In today’s blog, Appinnovix is sharing the latest WordPress Statistics 2025 along with its captivating usage for the business! But before that let us also know some quick facts about WordPress to learn something from its business model.
Table of Contents
Introduction to WordPress
- WordPress came into being in the year 2005 as a blogging platform. But soon it expanded as a Content Management System and later as a website development platform.
- The parent company of WordPress is Automattic which is headquartered in San Fransisco, California, USA.
- Matt Mullenweg, an American Entrepreneur and Web Developer has developed WordPress and founded Automattic.
- Do you know that WordPress is an open-source web software and not a blogging platform?
- Today WordPress has over 31, 000 WordPress themes in total of which around 10,000 themes are free of cost.
Clearly, during its 20 years of existence, WordPress has witnessed miraculously tremendous success with its growth-oriented business approach. And you too can benefit from WordPress this year! Know the latest WordPress Stats and find some exclusive ideas from Appinnovix to grow your business with WordPress Stats!
So stay glued to this article and get ready to benefit from the latest WP Stats this year!
Popular WordPress Statistics and Its Usage in Business
1. WordPress Statistics 2025: How Many Websites Were Created with WordPress in 2025?
According to Colorlib, an IT Consulting company, about 810 million websites on the globe were created using WordPress in 2025. Some popular reasons behind using WordPress websites by users include-
- User-friendly interface
- No coding required
- Flexibility in website development
- Availability of over 31,000 free and premium website themes
- Most important, its SEO-friendliness
When a website development platform allows such features, then it is natural for web developers to opt for this option. Therefore, WordPress is the most popular platform for website development all over the world. In fact, none of its competitors has been able to beat it in terms of market share discussed further in this blog.
Business Growth Tip
If you are planning to own a website this year for your business, we would recommend that you opt for a WordPress website. In addition to the above-listed benefits of WordPress, there are other benefits too. First of all, the website development process will be time and cost-saving even if you hire a web developer. And secondly, if you are a new business or a start-up unwilling to offer a fat fee to the web developer, then you can develop a website on your own. Also, if you feel stuck at any point, you will find thousands of YouTube videos and online blogs about ‘How to Use WordPress?’. This way you can save a great deal of time and cost!
2. WordPress Statistics Estimates the WordPress Usage Increases by 12% Each Year on an Average!
According to WordPress Usage Statistics, an estimate states that WordPress Usage increases by 12% every year. It implies that WordPress users are growing every year without any setbacks! So, on an estimate, if people created 810 million WordPress by 2025, and WordPress usage increases in number by 12% each year, then by 2028 we will have over 1.4 billion WordPress websites in the world.

As a matter of fact, we can also estimate, that most of the users will be using WordPress websites and will become accustomed to its interface. Once, the users become habitual of using WordPress websites, it is possible that users might grow habitual of WordPress as much as they are habitual of using Google.
Business Growth Tip!
So, Appinnovix would advise all the existing and upcoming businesses, to opt for WordPress website development for their business. The more user-friendly the website you create, the more visitors you will get to your website.
Furthermore, as we discussed earlier WordPress is deemed as the most SEO-Friendly website development platform. Eventually, this will bring natural website traffic to your online site, and you can convert this online traffic into physical traffic for your business stores.
3. According to WordPress Statistics, Around 1 Million Popular Brands Use WordPress
Did you know that around 1 Million popular brands are already using WordPress websites and WordPress CMS for their business growth? And most of these popular brands are from the media and journalism industries. To list a few anecdotal names we have-
- Bloomberg
- TechCrunch
- CNN
- Time Magazine
- Microsoft News
- Wired
- Vogue
- Angry Birds
- The New York Times Company
And many more! Moreover, the reasons we have already listed above in this blog. So there is no need to explain again why WordPress is the choice of so many businesses these days.
Business Growth Tip!
So, if you are a media company or you are a startup planning to start an online news platform, then you must give WordPress a try. Use the free WordPress blogging platform and get access to free WordPress analytics for your platform. In this way, you can start your own news and blogging platform with 0 business investment!
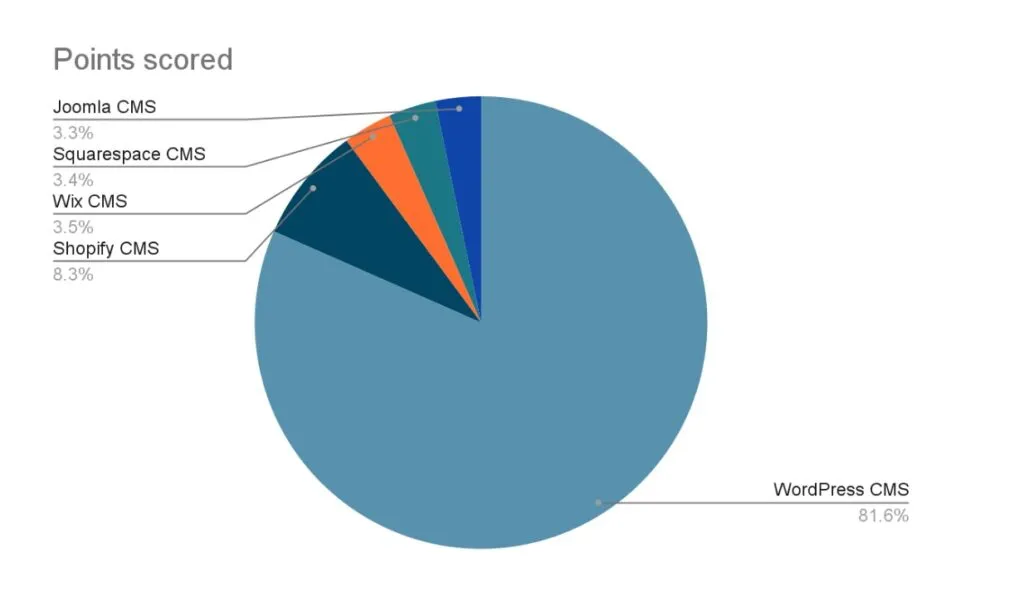
4. WordPress CMS has the Largest 64.2% Market Share
When compared to its competitors, the latest WordPress statistics from the popular tech survey platform W3Tech reveal that of all websites using a CMS, 65.2% of them use WordPress. This WordPress Statistics is followed by Shopify, Wix, Squarespace, and Joomla having 6.6%, 2.8%, 2.7%, and 2.6% market shares respectively.
Business Growth Tip
As WordPress CMS has such a lion’s share in the market, WordPress is less likely to shut operations overnight. Therefore, one can see WordPress as the most reliable website development platform, web host, and CMS system. Furthermore, the two biggest reasons that make WordPress so popular are-
- Its SEO-Friendliness and ability to rank quickly on Google SERP.
- 10, 000 Free WordPress Templates for website development.
Since, these two reasons make WP this popular, users will continue to benefit from these two WP features throughout their lives. No business cuts down the qualities that bring ultimate success to it.
So, if you want to experience great SEO and enjoy free website development, then use WordPress for website creation. You may also pursue a WordPress development course and can start your own freelancing website development business with an investment of less than 25K INR!
5. 61.2% of WordPress Users Have the Latest WP Version as per WordPress Statistics
According to the Colorlib WordPress Statistics, 61.2% of the total WordPress users use the latest WordPress 6.2 Version. Furthermore, W3Tech states that a total of 74% of WordPress users have WordPress 6 Version as a whole.

The WordPress User statistics further reveal that WordPress Versions 5, 4, 3, and 2 have 20.1%, 5.5%, 0.4%, and 0.1% of users respectively.
Business Growth Tip
Thus, Appinnovix advises you to always keep your WordPress version up to date. Using the latest updated WordPress version for your WordPress website unlocks the latest and more exciting features for your website. This makes your business website more interactive, engaging, and interesting!
It will reduce the bounce rate from your web pages and will ensure traffic retention! Also, it will give more opportunities to your web page visitors to explore your blogs, products, and services more!
6. There Are Over 10K Free WordPress Themes, of Which Divi is the Most Popular as per the Latest WordPress Statistics
WordPress statistics further reveal that till September 2025, there are around 31,000 WordPress themes available to choose a website theme from. Of these 31,000 WordPress templates or themes around 10,000 themes are free to use. Furthermore, Divi is the most popular free WordPress Theme in 2025. Apart from Divi, Astra, Zakra, Elementor, Botiga, and Vogue.
These WordPress themes are not only free but also easy to customize. And even if you do not have any coding background, you do not have to bother. You may still create professional and free-of-cost websites with the help of these free WordPress templates.
Business Growth Tip
Are you looking for a career change? Do you feel stuck at your job? Well, why don’t you look forward to starting your own website designing business? Oh, you are not from the IT sector? Well, worry not! Pack yourself for 2 hours each weekend. Explore WordPress free website themes and master web design at 0 investment! And in just a few weeks, you will be ready to launch your exclusive website design business!
7. 97% of Bloggers in The World Use WordPress for Blogging
Lastly, one of the most important WordPress Statistics in 2025 is that there are over 600 million blogs on the Internet in this world. And around 97% of bloggers use WordPress for posting blogs. In a nutshell, WordPress is the home to 60 million blogs in this world. However, many blogs are dedicated to content marketing, but the number of health, beauty, personal care, beauty, and tech blogs is no less.
Furthermore, more than 80% of bloggers have reported in a survey, that writing blogs has driven results. People have connected to bloggers and many bloggers in the IT and beauty sectors have gained popularity through their blogs. Also, many people tend to read blogs of their interest on a daily basis. And these WP stats can make you popular too this year. How? Read the tip below-
Business Growth Tip
Do you feel you are good at reviewing any beauty product? Or you can help a naive person by buying a phone, tablet, laptop, or any other gadget? Or are you great at providing health and fitness tips? Well, try finding an area you are good at! And if you are a keen writer on top of it, then believe us! You can start your WordPress blog today and experience popularity in 2024!
Final Thoughts
So, WordPress statistics reveal that it is not only WordPress that is getting famous but also the bloggers and businesses associated with WordPress are growing popular day by day. Many people use WordPress for free website development for their businesses and blogs. The SEO-friendly nature of WP and its other exciting features discussed above in this blog have made WordPress popular among people. And people in turn, by using these WordPress features, free website themes, and CMS plugins have gained popularity further.
So, you too can plan to give WordPress a chance in your career and business. And Appinnovix is sure that you too will make history as WordPress has made! Have a great year ahead! Appinnovix Wishes you all the best!
Some Useful links:
Mobile App Development Company